 10:53
10:53Resumen. GoHighLevel assigns a shared sending domain to all new accounts, which means your emails go out alongside everyone else on that domain, including accounts with poor sending habits. Setting up a dedicated domain gives your sub account its own sending identity. This tutorial covers creating a dedicated domain inside GoHighLevel, adding the required DNS records at your registrar, verifying the domain, configuring header display settings, and managing multiple domains for different sending purposes.
Lo que aprenderás
- Why the default shared domain hurts your sender reputation
- How to add and verify a dedicated domain in GoHighLevel settings
- Which DNS records to create (TXT, MX, CNAME) and why each one matters
- How to set custom header values so recipients see your main domain
- How to manage and configure multiple dedicated domains in one account
Pasos
Open Email Services in your sub account
In your GoHighLevel sub account, go to Settings and select Email Services. This is where you manage all sending domains and email configurations.
Add a new dedicated domain
Click Dedicated Domain, then Add Domain. Enter a subdomain you control, typically something like mg.yourdomain.com, and click Add and Verify.
Copy the DNS records GoHighLevel provides
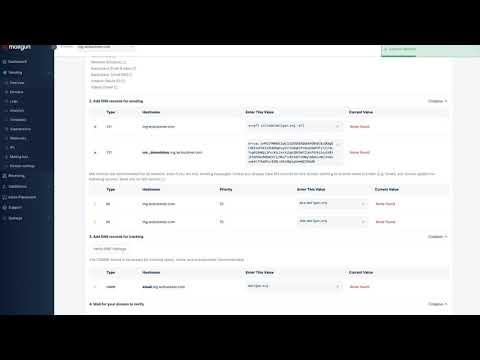
After adding the domain, GoHighLevel displays a set of DNS records you need to create: TXT records for SPF and DKIM, an MX record for inbound routing, and a CNAME for tracking. Copy each value carefully.
Add the records at your domain registrar
Log in to wherever you registered your domain (GoDaddy, Cloudflare, Namecheap, etc.) and create each record exactly as shown. Paste the full values without trimming anything.
Verify the domain
Return to GoHighLevel and click Verify Domain. DNS propagation usually takes a few minutes but can take up to an hour. If verification fails, wait and try again rather than re-entering the records.
Configure header display settings
Inside Dedicated Domain settings, find the Dedicated Header section. Set the display name and email address you want recipients to see in the From line. This does not change the actual sending domain but controls what shows in email clients.
Set the domain as active for your sending
Once verified, return to Email Services and confirm the new domain is selected as the active sending domain for this sub account. Send a test email to check that the mailed-by and signed-by headers show your domain.
Consejos
- Use a subdomain (mg.yourdomain.com) rather than your root domain to keep email authentication separate from your website DNS.
- If your domain registrar is Cloudflare, set the CNAME record to DNS-only (grey cloud) rather than proxied, or verification will fail.
- Check Gmail's 'show original' on a test email to confirm SPF and DKIM both show as PASS before sending to a live list.