 4:03
4:03概要. This tutorial walks through connecting any trigger app in Zapier to GoHighLevel as the action destination. It covers locating the GoHighLevel API key inside location settings, authorizing the connection, selecting the right action type (add lead, add contact, stop campaigns, or manage opportunities), mapping data fields including custom fields and event dates, and testing the Zap before turning it on.
学べること
- Where to find your GoHighLevel API key inside location settings
- How to pick the right Zapier action for your use case
- How to map contact fields from any trigger app into GoHighLevel
- What the appointment-date field does and when to use it
- How to test a Zap and confirm the lead landed in GoHighLevel
ステップ
Create a new Zap in Zapier
Log in to Zapier and start a new Zap. Select the app you want to use as the trigger, for example a form tool or a CRM, and choose the event that will fire the Zap.
Add GoHighLevel as the action app
In the action step, search for HighLevel and select it from the list. You will be asked to choose what action to run.
Choose the right action type
The most common choice is Add Lead to Campaign, which creates a contact and enrolls them in a campaign. Other options include Add Contact, Stop All Campaigns for Lead, Add/Update Opportunity, and Add Task.
Get your GoHighLevel API key
Inside GoHighLevel, switch to the sub-account (location) you want to connect. Go to Settings, then scroll down to find the API Key field under company settings. Copy that key.
Authorize the GoHighLevel connection
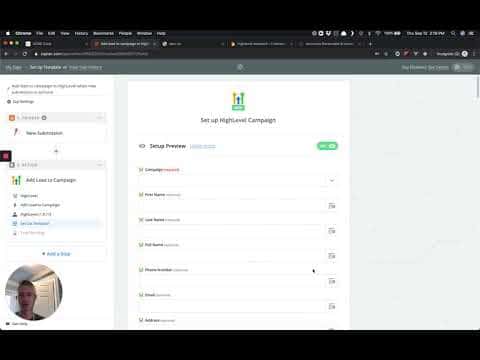
Back in Zapier, click Connect an Account, paste your API key, and click Save. Zapier will confirm the connection and load your campaigns and custom fields from that location.
Map contact fields
Select the campaign you want to enroll leads in. Then map the trigger data (name, email, phone, and any custom fields) to the corresponding GoHighLevel fields. If you are using an appointment-based campaign, pass the appointment date into the event date field.
Test and activate
Click Continue, then Send Test to GoHighLevel. Confirm the test contact appeared in the correct campaign. Turn the Zap on, and all future submissions will route automatically.
ヒント
- Use a sub-account API key, not an agency-level key, so data lands in the right location.
- The event date field only matters for appointment-based campaigns. Leave it blank for standard drip campaigns.
- Map custom fields to keep lead data clean inside the GoHighLevel CRM.